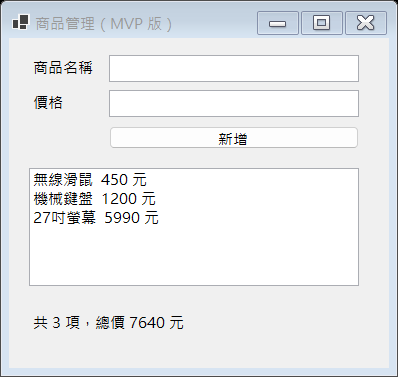
上一篇我們做了一支能動的商品管理程式,然後指出它的四個問題:不能測試、換 UI 要重寫、功能一多就爆炸、多人協作必衝突。根源是同一個——MainForm 同時扮演了畫面、資料、業務規則三種角色。
這篇把它拆開。功能完全不變,跑起來一模一樣,但結束時你會得到一件上一篇做不到的事:在完全不開啟視窗的情況下,用程式驗證「價格輸入負數會被擋下來」。
想邊看邊對照的話,完整原始碼可以先抓下來:👉 下載 MvpDemo 完整原始碼(.zip)。我已經實際解壓縮到另一個資料夾重新建置並跑過測試,確認下載就能用;文章最後也會再放一次連結與執行說明。
先看完成後的樣子
專案結構長這樣,三個專案:
MvpDemo/
├── MvpDemo.slnx                       方案檔
├── MvpDemo.Core/                      Model + Presenter(不含任何 UI)
│   ├── Models/
│   │   ├── Product.cs                 一筆商品
│   │   ├── AddResult.cs               新增結果(成功/失敗+原因)
│   │   └── ProductService.cs          驗證規則、儲存、統計
│   ├── Views/
│   │   └── IProductView.cs            畫面必須提供的能力
│   └── Presenters/
│       └── ProductPresenter.cs        把流程串起來
├── MvpDemo.App/                       WinForms 視窗程式
│   ├── MainForm.cs                    實作 IProductView
│   └── Program.cs                     組裝三個角色
└── MvpDemo.Tests/                     xUnit 測試
    ├── FakeProductView.cs             假的畫面
└── ProductPresenterTests.cs 六個測試上一篇說會拆成四個檔案,這裡多做了一步:把 Model 和 Presenter 放進一個獨立的類別庫 `MvpDemo.Core`。
這一步值得解釋,因為它是整篇最有力的部分。看一下三個專案的 target framework:
<!-- MvpDemo.Core.csproj -->
<TargetFramework>net10.0</TargetFramework>

<!-- MvpDemo.App.csproj -->
<TargetFramework>net10.0-windows</TargetFramework>

<!-- MvpDemo.Tests.csproj -->
<TargetFramework>net10.0</TargetFramework>
MvpDemo.Core 是 net10.0,不是 net10.0-windows——它在編譯層級就無法引用 WinForms。你就算想在 ProductService 裡偷寫一行 MessageBox.Show,編譯器也會直接拒絕你。
這把「Model 不該知道畫面存在」從一句口號變成編譯器強制執行的規則。同樣的道理,測試專案也是 net10.0——它連 WinForms 都沒引用,卻能完整測試你的業務邏輯。這就是分層真正的價值。
建立方式(在空資料夾裡依序執行):
dotnet new sln -n MvpDemo
dotnet new classlib -o MvpDemo.Core -n MvpDemo.Core
dotnet new winforms -o MvpDemo.App -n MvpDemo.App
dotnet new xunit -o MvpDemo.Tests -n MvpDemo.Tests
dotnet sln add MvpDemo.Core MvpDemo.App MvpDemo.Tests
cd MvpDemo.App && dotnet add reference ../MvpDemo.Core && cd ..
cd MvpDemo.Tests && dotnet add reference ../MvpDemo.Core && cd ..注意箭頭都是單向的:App 和 Tests 都依賴 Core,Core 誰也不依賴。這個方向不能反過來——Core 一旦引用了 App,整個設計就白做了。
Model 第一層:Product 與 AddResult
先是最單純的一筆商品資料:
namespace MvpDemo.Core.Models;

public class Product
{
    public string Name { get; }
    public int Price { get; }

    public Product(string name, int price)
    {
        Name = name;
        Price = price;
    }
}兩個屬性都只有 `get` 沒有 `set`,只能在建構式裡指定。這叫唯讀(immutable)——建立之後就不能改,要改就建立新的一筆。好處是你永遠不必擔心「這筆商品在別的地方被偷偷改掉了」,追 bug 時可以少排除一整類可能性。
接著是一個很多人不會想到要建立的類別:用來表達「新增成功或失敗」的結果。
namespace MvpDemo.Core.Models;

public class AddResult
{
    public bool Success { get; }
    public string ErrorMessage { get; }

    private AddResult(bool success, string errorMessage)
    {
        Success = success;
        ErrorMessage = errorMessage;
    }

    public static AddResult Ok() => new AddResult(true, string.Empty);

    public static AddResult Fail(string message) => new AddResult(false, message);
}
Model 第二層:ProductService
這是整支程式的心臟——所有業務規則集中在這裡:
namespace MvpDemo.Core.Models;

public class ProductService
{
    private readonly List<Product> _products = new List<Product>();

    public IReadOnlyList<Product> Products => _products;

    public int Count => _products.Count;

    public int TotalPrice
    {
        get
        {
            int total = 0;
            foreach (Product p in _products)
            {
                total += p.Price;
            }
            return total;
        }
    }

    public AddResult Add(string name, string priceText)
    {
        if (string.IsNullOrWhiteSpace(name))
        {
            return AddResult.Fail("請輸入商品名稱");
        }

        if (!int.TryParse(priceText, out int price))
        {
            return AddResult.Fail("價格必須是數字");
        }

        if (price <= 0)
        {
            return AddResult.Fail("價格必須大於 0");
        }

        foreach (Product p in _products)
        {
            if (p.Name == name)
            {
                return AddResult.Fail("這個商品已經存在");
            }
        }

        _products.Add(new Product(name, price));
        return AddResult.Ok();
    }

    public bool Remove(string name)
    {
        for (int i = 0; i < _products.Count; i++)
        {
            if (_products[i].Name == name)
            {
                _products.RemoveAt(i);
                return true;
            }
        }
        return false;
    }
}
View 介面:Presenter 眼中的畫面
namespace MvpDemo.Core.Views;

public interface IProductView
{
    string ProductNameText { get; }
    string PriceText { get; }

    event EventHandler AddClicked;

    void AddProductToList(string display);
    void ShowSummary(string text);
    void ShowError(string message);
    void ClearInputs();
}
這個介面是整個 MVP 的樞紐,請仔細看它「沒有」什麼:沒有 TextBox、沒有 ListBox、沒有 Label、沒有 。它描述的全是——「能提供使用者輸入的名稱」「能顯示一則錯誤」——而不是。
Presenter:把流程串起來
using MvpDemo.Core.Models;
using MvpDemo.Core.Views;

namespace MvpDemo.Core.Presenters;

public class ProductPresenter
{
    private readonly IProductView _view;
    private readonly ProductService _service;

    public ProductPresenter(IProductView view, ProductService service)
    {
        _view = view;
        _service = service;

        _view.AddClicked += OnAddClicked;

        _view.ShowSummary(BuildSummary());
    }

    private void OnAddClicked(object? sender, EventArgs e)
    {
        AddProduct();
    }

    public void AddProduct()
    {
        AddResult result = _service.Add(_view.ProductNameText, _view.PriceText);

        if (!result.Success)
        {
            _view.ShowError(result.ErrorMessage);
            return;
        }

        Product added = _service.Products[_service.Count - 1];
        _view.AddProductToList($"{added.Name}  {added.Price} 元");
        _view.ShowSummary(BuildSummary());
        _view.ClearInputs();
    }

    private string BuildSummary()
    {
        return $"共 {_service.Count} 項,總價 {_service.TotalPrice} 元";
    }
}
View 實作:MainForm 瘦下來了
using MvpDemo.Core.Views;

namespace MvpDemo.App;

public class MainForm : Form, IProductView
{
    private readonly TextBox txtName = new TextBox();
    private readonly TextBox txtPrice = new TextBox();
    private readonly Button btnAdd = new Button();
    private readonly ListBox lstItems = new ListBox();
    private readonly Label lblSummary = new Label();

    public MainForm()
    {
        Text = "商品管理(MVP 版)";
        ClientSize = new Size(380, 330);

        var lblName = new Label { Text = "商品名稱", Location = new Point(20, 20), AutoSize = true };
        txtName.Location = new Point(100, 17);
        txtName.Width = 250;

        var lblPrice = new Label { Text = "價格", Location = new Point(20, 55), AutoSize = true };
        txtPrice.Location = new Point(100, 52);
        txtPrice.Width = 250;

        btnAdd.Text = "新增";
        btnAdd.Location = new Point(100, 88);
        btnAdd.Width = 250;
        btnAdd.Click += (s, e) => AddClicked?.Invoke(this, EventArgs.Empty);

        lstItems.Location = new Point(20, 130);
        lstItems.Size = new Size(330, 130);

        lblSummary.Location = new Point(20, 275);
        lblSummary.AutoSize = true;

        Controls.AddRange(new Control[] { lblName, txtName, lblPrice, txtPrice, btnAdd, lstItems, lblSummary });
    }

    // ---- IProductView 實作 ----

    public string ProductNameText => txtName.Text;

    public string PriceText => txtPrice.Text;

    public event EventHandler? AddClicked;

    public void AddProductToList(string display) => lstItems.Items.Add(display);

    public void ShowSummary(string text) => lblSummary.Text = text;

    public void ShowError(string message) => MessageBox.Show(message);

    public void ClearInputs()
    {
        txtName.Clear();
        txtPrice.Clear();
        txtName.Focus();
    }
}
組裝:Program.cs
三個角色都寫好了,總要有人把它們接起來:
using MvpDemo.Core.Models;
using MvpDemo.Core.Presenters;

namespace MvpDemo.App;

static class Program
{
    [STAThread]
    static void Main()
    {
        ApplicationConfiguration.Initialize();

        var view = new MainForm();
        var service = new ProductService();
        _ = new ProductPresenter(view, service);

        Application.Run(view);
    }
}
現在來寫測試——完全不開視窗
這是整個系列的重點。先做一個假的畫面:
using MvpDemo.Core.Views;

namespace MvpDemo.Tests;

public class FakeProductView : IProductView
{
    public string ProductNameText { get; set; } = string.Empty;
    public string PriceText { get; set; } = string.Empty;

    public event EventHandler? AddClicked;

    public List<string> ListItems { get; } = new List<string>();
    public List<string> Errors { get; } = new List<string>();
    public string Summary { get; private set; } = string.Empty;
    public int ClearInputsCallCount { get; private set; }

    public void AddProductToList(string display) => ListItems.Add(display);

    public void ShowSummary(string text) => Summary = text;

    public void ShowError(string message) => Errors.Add(message);

    public void ClearInputs() => ClearInputsCallCount++;

    public void ClickAdd() => AddClicked?.Invoke(this, EventArgs.Empty);
}
前後對照:到底換到了什麼
回頭檢查上一篇提出的四個問題。
能測試了。 剛才那六個測試就是答案。而且注意測試專案的 target framework 是 net10.0——它完全沒有引用 WinForms,卻能測試你所有的業務規則。
換 UI 不用重寫。 今天要做網頁版,MvpDemo.Core 整包搬過去就能用,一行都不用改,因為它裡面沒有任何 WinForms 的痕跡。要重寫的只有 MainForm——那本來就該重寫,因為畫面本來就不一樣。
功能變多不會爆炸。 加「刪除商品」時,規則寫進 ProductService.Remove()(已經幫你留好了),流程寫進 ProductPresenter,畫面加一個按鈕與一個 RemoveProductFromList 方法。三件事各自待在自己該在的地方,MainForm 不會再膨脹。
協作衝突變少。 做畫面的人改 MvpDemo.App,做邏輯的人改 MvpDemo.Core,兩邊碰的是不同檔案甚至不同專案。
代價也要誠實講:檔案從 1 個變成 8 個,程式碼總行數變多了。 對一支只有「新增」功能的程式來說,MVP 確實是殺雞用牛刀——如果你要寫的只是一個五分鐘的小工具,全部塞在 Form 裡沒有錯,不必為了架構而架構。
MVP 值得的時機是:這支程式會活很久、會一直加功能、會有人接手,或者你希望邏輯能被測試。 三個條件中一個成立,拆分就開始回本。
動手練習:加上「刪除商品」
ProductService.Remove() 已經幫你寫好了。你需要動的是另外三個地方:
1. `IProductView`:加一個 SelectedProductName(使用者在清單裡選了哪一項)、一個 RemoveClicked 事件、一個 RemoveProductFromList(string display) 方法
2. `ProductPresenter`:訂閱 RemoveClicked,呼叫 _service.Remove(...),成功就叫 View 移除該項並更新統計,失敗就顯示錯誤
3. `MainForm`:加一個「刪除」按鈕、實作那三個新成員
寫完之後,先別急著開視窗測試——在 FakeProductView 加上對應的假實作,然後寫一個測試:
[Fact]
public void 刪除商品_統計應該正確減少()
{
    // 新增兩筆、刪除一筆,驗證 Summary 變成「共 1 項,總價 ... 元」
}如果這個測試過了,你的邏輯就是對的,開視窗只是確認按鈕位置有沒有擺好。這個「先測試、後開視窗」的順序,就是這兩篇文章想帶你抵達的地方。
下載完整程式碼
上面所有程式碼都在這個壓縮檔裡,13 個檔案、三個專案:
解壓縮之後:
cd MvpDemo
dotnet build       # 建置三個專案
dotnet test        # 跑六個測試
cd MvpDemo.App
dotnet run         # 開啟視窗